Baking & dessert
Lemon and Strawberry Cake
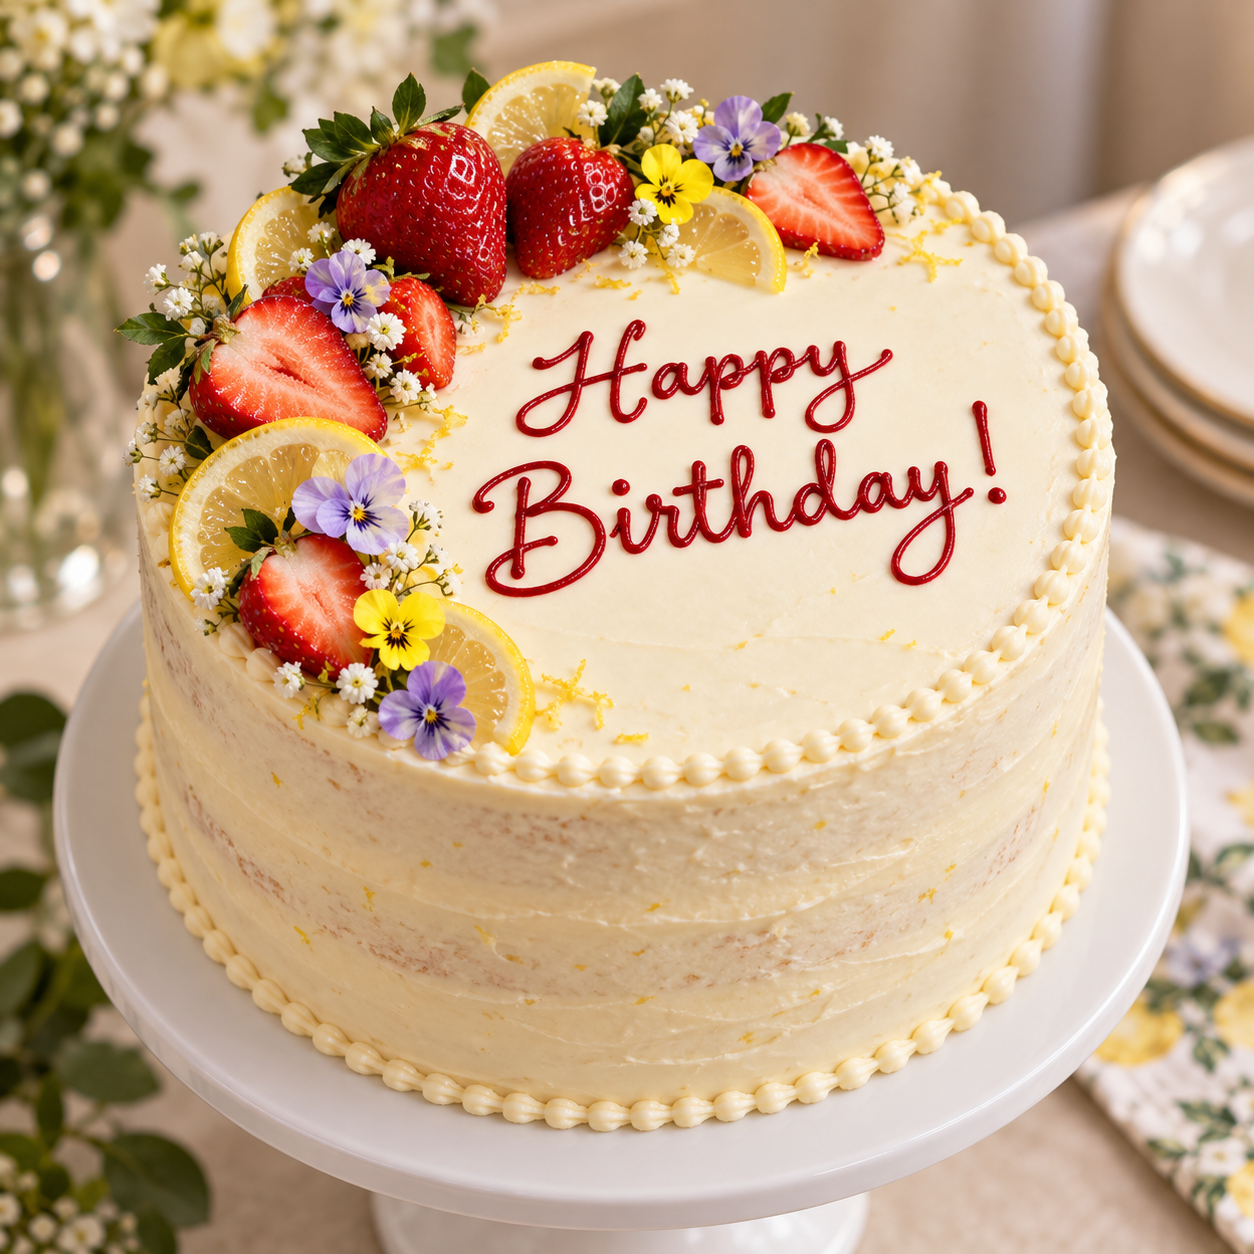
A three-layer lemon sponge with a thin strawberry filling, ivory lemon cream-cheese frosting, delicate shell borders, red “Happy Birthday!” lettering, candied lemon, fresh strawberries and edible violas. There is no soaking syrup in this version.
Clear and checked
Method
- 01
Slice and blanch the lemon
5 minHands-onCut the unwaxed lemon into approximately 2mm slices and remove the seeds carefully. Blanch the slices in gently simmering water for 2 minutes, then drain.
- 02
Dissolve the candy sugar and add lemon slices
5 minHands-onWarm 150g sugar and 150g water in a wide saucepan until the sugar dissolves, then add the lemon slices with minimal overlap.
- 03
Simmer the lemon slices
40 minHands-off · check as directedSimmer very gently, checking from 25 minutes and allowing up to 45–60 minutes for thicker rind, until the pith is translucent and the rind tender.
- 04
Transfer the candied lemon slices
3 minHands-onTransfer the lemon slices carefully to baking parchment
- 05
Dry the candied lemon overnight
720 minHands-off · check as directedLeave them overnight to dry. They should remain pliable and slightly tacky, with no liquid dripping from them
- 06
Cut the dried lemon into half-moons
3 minHands-onCut the best slices into half-moons.
- 07
Cook the strawberry filling
10 minHands-onFinely chop the 250g hulled strawberries and cook them with 35g sugar and 10g lemon juice over medium-low heat, stirring frequently. Crush some of the fruit and reduce the mixture to approximately 180g.
- 08
Thicken the strawberry filling
2 minHands-onMix 5g cornflour with 10g cold water until smooth, stir it again, then pour it into the gently bubbling strawberries. Cook for 1 minute, stirring continuously, then remove from the heat.
- 09
Transfer the strawberry filling
2 minHands-onTransfer the filling to a shallow container
- 10
Cool and refrigerate the strawberry filling
60 minHands-off · check as directedLet the steam subside, then cover and refrigerate until completely cold. Reserve 150–160g for the cake, divided between the two filling layers.
- 11
Prepare the tins and ingredients
15 minHands-onBring the eggs to room temperature, beat the eggs briefly and weigh out 200g. Heat the oven to 160°C fan / 180°C conventional, then grease and line three 20cm tins and measure all remaining sponge ingredients.
- 12
Whisk the eggs and sugar
10 minHands-onWhisk the eggs briefly, then add the sugar gradually. Continue whisking for about 7–10 minutes until the mixture is pale, very voluminous and falls in a thick ribbon.
- 13
Heat the milk and butter
5 minHands-onWhile the eggs whisk, heat the milk and butter together until the butter has melted and the mixture is steaming. Do not let it boil.
- 14
Add the dry ingredients
3 minHands-onCombine the plain flour, baking powder and salt. Add them to the whipped egg mixture in three additions on the lowest mixer speed, stopping as soon as each addition is incorporated.
- 15
Add the hot liquid mixture
4 minHands-onOff the heat, combine the hot milk mixture with the oil, vanilla, lemon juice and zest, then whisk about two ladlefuls of batter into it. Slowly return this lightened mixture to the main bowl on low speed, scrape the base and mix only briefly.
- 16
Divide and load the sponge batter
3 minHands-onDivide the batter equally between the three tins and bake immediately.
- 17
Bake the sponges
26 minHands-off · check as directedCheck from 22 minutes; they will usually need 23–28 minutes, and are ready when the centres spring back and a skewer comes out clean.
- 18
Cool the sponges in their tins
15 minHands-off · check as directedCool the cakes in their tins for 15 minutes
- 19
Turn the sponges onto racks
2 minHands-onTurn them out gently onto racks.
- 20
Cool the sponges completely
45 minHands-off · check as directedLeave them until completely cold before filling.
- 21
Beat the butter and icing sugar
5 minHands-onBeat 200g softened butter until completely smooth. Add 200g sifted icing sugar gradually and beat for several minutes until pale and smooth.
- 22
Finish the cream-cheese frosting
3 minHands-onDrain any visible liquid from the cold cream cheese, then add it with the vanilla and mix only until uniformly smooth. Reserve 100g plain frosting for the borders, then stir the very finely grated lemon zest into the remainder.
- 23
Chill the frosting if needed
15 minHands-off · check as directedIf the frosting has warmed and softened, refrigerate it briefly before using. Do not keep beating it in an attempt to make it firmer.
- 24
Fill the first layer
8 minHands-onTrim only pronounced domes, secure the first sponge to the cake board with a dab of frosting and spread 40g lemon frosting thinly over it. Pipe a 5–6mm-high frosting ring near the edge and spread 75–80g cold strawberry filling inside it.
- 25
Fill the second layer and stack
8 minHands-onAdd the second sponge and repeat with 40g frosting, another low frosting ring and 75–80g strawberry filling. Add the final sponge with its flattest underside facing upwards and check the alignment from several directions.
- 26
Chill the stacked cake
50 minHands-off · check as directedRefrigerate the stacked cake for 45–60 minutes. The filling should be firm enough that the layers no longer shift when you begin coating the cake.
- 27
Apply the crumb coat
10 minHands-onSpread a thin crumb coat over the top and sides, filling any gaps between the layers. Scrape away the excess rather than building a thick layer.
- 28
Chill the crumb coat
30 minHands-off · check as directedRefrigerate the crumb-coated cake for about 30 minutes. It should feel firm enough to touch lightly without frosting lifting away.
- 29
Apply the final ivory coating
15 minHands-onMake the top opaque and smooth, while scraping the sides thinly enough that a faint suggestion of sponge shows through. Draw any raised frosting at the top edge gently inwards and save a little frosting for repairs rather than using it all.
- 30
Chill the coated cake overnight
720 minHands-off · check as directedPlace the coated cake in its box and refrigerate overnight. Keep it level so the layers and finish stay straight.
- 31
Pipe the shell borders
10 minHands-onLet the reserved plain frosting soften just enough to pipe, then use a small star nozzle to make narrow shell borders around the top edge and base. Keep the border about 5–7mm wide and practise a short row on parchment first.
- 32
Make the red writing buttercream
5 minHands-onBeat 20g softened butter with 40g sifted icing sugar until smooth, then mix in concentrated red gel colouring. If necessary, soften it with water only one or two drops at a time until it pipes in an unbroken line.
- 33
Plan and pipe “Happy Birthday!”
15 minHands-onPractise the inscription on baking parchment and lightly mark the lettering position on the chilled, dry cake with a cocktail stick. Pipe “Happy” above “Birthday!” slightly towards the front-right, leaving the back and left side free for the fruit crescent.
- 34
Prepare the fruit and optional glaze
10 minHands-onWash the decorating strawberries and dry them thoroughly, then select about two whole berries and four to six halves. If using the glaze, warm 20g apricot jam with 1 tsp water, strain it and cool until barely warm before brushing a very thin film over the cut strawberry surfaces.
- 35
Arrange the fruit, lemon and flowers
10 minHands-onBuild a crescent around the back and left edge with the strawberries and four to six candied lemon half-moons, then add the edible violas. Finish with a small pinch of very fine lemon zest and keep the lettering fully clear.
- 36
Chill the finished cake
30 minHands-off · check as directedRefrigerate the finished cake until the coating is firm before travelling
- 37
Transport the cake securely
5 minHands-onTransport it on its cake board inside the box on a flat, non-slip surface.
- 38
Store the cake chilled until serving
1 minHands-onKeep it refrigerated at 0–5°C, including at the venue.
- 39
Bring the cake to serving temperature
50 minHands-off · check as directedAllow the cake about 45–60 minutes in a cool room before serving, shortening this in warm conditions.
- 40
Cut and serve the cake
5 minHands-onCut with a long clean knife, wiping it between slices, and refrigerate leftovers promptly for up to two days.
Equipment check
13 items required
- Three 20cm round cake tins, at least 4cm deep
- Baking parchment
- Digital scales
- Electric hand mixer or stand mixer
- Cooling racks
- Small saucepan and a wide shallow saucepan
- 25cm cake board and a suitably tall cake box
- Palette knife and cake scraper
- Cake turntable, if available
- Piping bags
- Small star nozzle for the borders
- Small round nozzle, approximately 1.5–2mm, for lettering
- Pastry brush and cocktail stick
Dietary and allergen note: Contains gluten, eggs and dairy. Use only flowers specifically sold as food-grade edible flowers.
Check the listed equipment and capacity before you start.
Recipe diagnostics
Checked before you cook.
Three 20cm sponge layers with no soaking syrup
Strawberry filling reduced to approximately 180g and chilled completely before stacking
Cream cheese kept cold and mixed only until smooth
Finished cake kept refrigerated at 0–5°C
Community reviews
No reviews yet.
Rate a recipe and record how you cooked it using Made it. The community score uses each cook’s latest public rating.
Cook this recipe, then use Made it to add your first rating or review.